Keyboard shortcuts:
N/СпейсNext Slide
PPrevious Slide
OSlides Overview
ctrl+left clickZoom Element
If you want print version => add '
?print-pdf' at the end of slides URL (remove '#' fragment) and then print.
Like: https://progressbg-python-course.github.io/...CourseIntro.html?print-pdf
Installing Python Packages - the safe way
Created for
Iva E. Popova, 2016-2025,

PIP - the Python Package Manager
PIP - the Python Package Manager
- Python has a strong community which releases lot's of modules(packages), which you can use for free and focus on "get job done", instead of reinventing the wheel.
- pip is the tool for installing Python packages from PyPI (Python Package Index)
- Note, that if you do not use a Virtual Environment, a package installed by using pip will be installed in your system's python distribution.
pip basic commands
- get help on pip:
- pip help
- install a package from PyPI:
- pip install package_name
- uninstall a package
- pip uninstall package_name
- list installed packages:
- pip list
- upgrade a package:
- pip install --upgrade SomePackage
- show information about installed packages.:
- pip show package_name
- output installed packages in requirements format
- pip freeze
Reference: pip commands
More readings
Python Virtual Environments
Python Virtual Environments
Virtual environment - Why?
- Python apps usually depends on many modules(packages), which depends on other packages, and very often - from a specific version of a package.
- Many system tools also depends on specific versions of installed Python packages.
- You don't want to pollute your system's Python environment or to deal with dependency hell!
Virtual environment - What?
- A virtual environment is an isolated Python environment that allows packages to be installed for use by a particular application, rather than being installed system wide
- A virtual environment is a directory tree which contains Python interpreter, libraries and scripts installed into it, and other files which indicate that it is a virtual environment.
- There are many tools for working with virtual environments in Python (virtualenv, pipenv, poetry, conda, etc.)
- Starting with Python 3.4,
venvmodule is the preferred way to create and manage virtual environments. - venv module is included in the Python standard library and requires no additional installation.
Create Virtual Environment
- Open Terminal and make sure that current working directory is the one where you want the virtual environment to be created
- a folder '.venv' is created in the project folder
.venvis a common name for a virtual environment as it keeps the directory typically hidden in your shell.- Note, that you need to create a virtual environment per project only once. But each time you work in your project you must activate it.
                ### make sure you are in project folder, where you want to use virtual environment
                # Command Prompt:
                cd

                # Linux/MacOS:
                pwd

                ### create virtual environment with name ".venv"
                python -m venv .venv
- In order to install and use python packages in your virtiual env, you must activate it:
- If on PowerShell you receive an error File ... cannot be loaded because running scripts is disabled on this system you must first set the PowerShell execution policies (Set-ExecutionPolicy @microsoft.com):
- You can confirm you’re in the virtual environment by checking the location of your Python interpreter:
- If you want to switch projects or otherwise leave your virtual environment, simply run
                # On Windows PowerShell run:
                .venv\Scripts\Activate.ps1

                # On Windows CommandPrompt run:
                .venv\Scripts\activate.bat

                # On Windows GitBash run:
                source .venv\Scripts\activate

                # On Linux, MacOS, run:
                source .venv/bin/activate
                Set-ExecutionPolicy Unrestricted -Scope Process
                # now try again to activate:
                .venv\Scripts\Activate.ps1
                # On Windows, run:
                where python

                # On Unix or MacOS, run:
                which python

                # It should be in the .venv directory
deactivate
References
- Virtual Environments and Packages @python3 tutorial
Installing packages in a virtual environments
Installing packages in a virtual environments
Install Project Dependencies
- Once the virtual environment is activated, whenever we use pip install to install any library, if we don’t specify the desired version of the library, pip will automatically install the latest version that is compatible with the python version inside the virtual environment
- Reference: Installing packages using pip and virtual environments
                # Create virt.env - just once per project
                python -m venv .venv

                # Activate it - every time you will work on the project:
                # On Windows CommandPrompt run:
                .venv\Scripts\activate.bat

                # On Linux, MacOS, run:
                source .venv/bin/activate

                # Install module
                pip install module_name
Freezing the dependency versions
Freezing the dependency versions
Overview
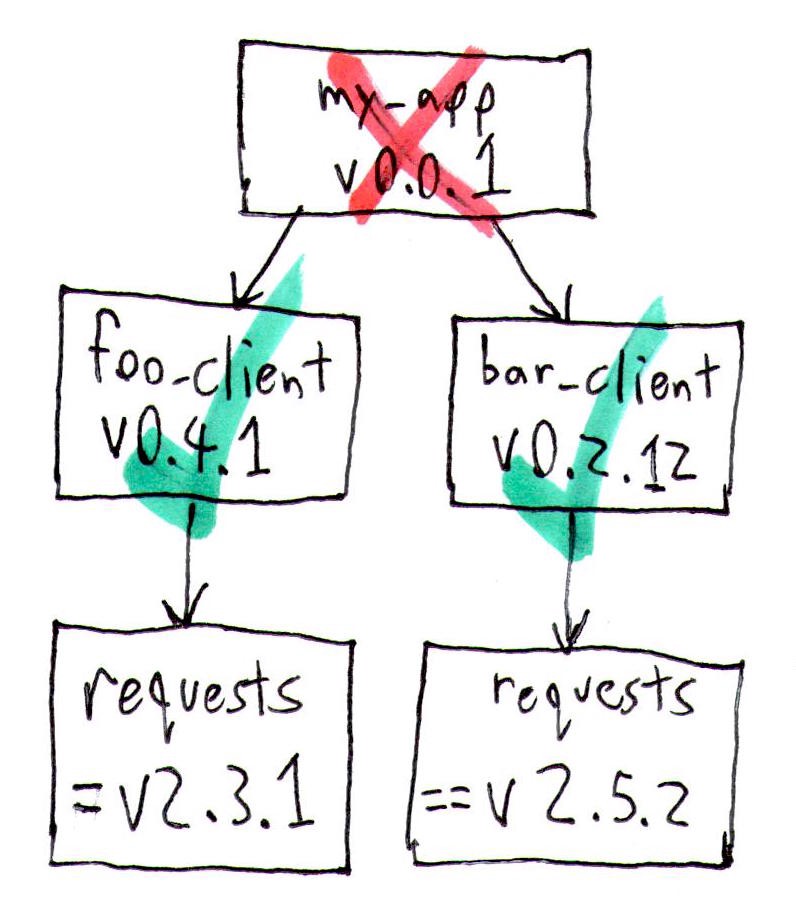
- "Freezing the dependency versions" in the context of Python development refers to the practice of creating a snapshot of all the packages and their exact versions that your project depends on.
- This is crucial for ensuring consistency, reproducibility, and stability across different environments (development, testing, production) and when sharing the project with others.
- It helps to avoid the "it works on my machine" problem by ensuring that everyone working on the project uses the same versions of dependencies.
the pip freeze
- Before freezing dependencies, ensure that your virtual environment is activated. This ensures that the dependency list is specific to your project and not your global Python installation.
- Once your virtual environment is activated, use
pip freezeto list all installed packages and their exact versions. Then, redirect the output to a requirements.txt file: - This requirements.txt file now contains a snapshot of all packages (with versions) installed in your virtual environment.
pip freeze > requirements.txt
Using the 'requirements.txt' file
- When you or someone else needs to set up the project environment, you can use the requirements.txt file to install all the dependencies at their frozen versions. Run:
- This command installs the exact versions of the packages listed in requirements.txt, ensuring that the environment is consistent with the original setup.
pip install -r requirements.txt
Creating Virtual Environments with Different Python Versions on Windows
Overview
- Creating virtual environments with different Python versions on a Windows system is an essential skill for managing dependencies and ensuring compatibility across multiple projects.
- This process requires having multiple versions of Python installed and knowing how to specify the version when creating a new virtual environment.
Install Multiple Versions of Python
- Download Python: go to the official Python website (python.org) and download the installer for the versions you need. Make sure to download the Windows installer for each version.
- Install Python: run each installer. During installation:
- Check the box that says "Add Python X.X to PATH" for each version you install. This makes it easier to access Python from the Command Prompt.
- Ensure each version is installed in a separate directory. The installer usually suggests a default directory like C:\Users\YourName\AppData\Local\Programs\Python\PythonXX where XX corresponds to the Python version.
- To verify the installation and check available Python versions, open Command Prompt:
                    # lists all installed Python versions
                    py -0
Create Virtual Environments with Specific Python Versions
- Using the py Launcher: you can specify which Python version to use for your virtual environment with the py launcher. Navigate to your project directory and run:
- Replace X.X with the Python version you want to use, and myenv with the name of your virtual environment.
- Activate the Virtual Environment: after creating the virtual environment, you need to activate it. Run:
py -X.X -m venv myenv
myenv\Scripts\activate
These slides are based on
customised version of
framework