Web Programming With Django
Created for
Iva E. Popova, 2018,

Introduction
Introduction
What is Django?
Django is a high-level Python Web framework that encourages rapid development and clean, pragmatic design. Built by experienced developers, it takes care of much of the hassle of Web development, so you can focus on writing your app without needing to reinvent the wheel. It’s free and open source
What is a Web Framework
- A web framework is a collection of modules that allows you to create applications or websites from an existing source, instead of from scratch
- admin panels
- authentication support
- contact forms, comment boxes
- file upload
The basics of HTTP: Client-Server_Communication

Creating a Simple Django App
Simple Crawler App
Prerequisites
Set up the ToDoApp project
Set up the ToDoApp project
Creating the project structure
			$ cd myprojects
			$ django-admin startproject ToDoApp
A folder ToDoApp will be created into myprojects folder. It is just a a container for the project (it does not matter anything to Django) and we can safely rename it as ToDoAppProject. We also would like to rename mysite with ToDoApp
			ToDoAppProject/
			├── manage.py
			└── ToDoApp
			    ├── __init__.py
			    ├── settings.py
			    ├── urls.py
			    └── wsgi.py
Project Structure Content
- manage.py: A command-line utility that lets you interact with this Django project in various ways.
- ToDoApp/: this folder is the actual Python package for your project. Its name is the Python package name you'll need to use to import anything inside it
- ToDoApp/__init__.py: An empty file that tells Python that this directory should be considered a Python package.
- ToDoApp/settings.py: Settings/configuration for this Django project
- ToDoApp/urls.py: The URL declarations for this Django project; a “table of contents” of your Django-powered site
- ToDoApp/wsgi.py: An entry-point for WSGI-compatible web servers to serve your project
Verify the project
			$ cd ToDoAppProject/
			$ python manage.py runserver
			Performing system checks...

			System check identified no issues (0 silenced).

			You have 14 unapplied migration(s). Your project may not work properly until you apply the migrations for app(s): admin, auth, contenttypes, sessions.
			Run 'python manage.py migrate' to apply them.

			April 18, 2018 - 21:22:56
			Django version 2.0.4, using settings 'ToDoApp.settings'
			Starting development server at http://127.0.0.1:8000/
			Quit the server with CONTROL-C.
We will deal with migration warning later
Verify the project
- Do not close the terminal. The Django development server was started, and you can see you app running if you point your browser to http://127.0.0.1:8000/
- The server, included with Djano is intended to be used only for development. For production projects, you'll need to set up a server like Apache HTTP Server.
Start the ToDoApp
Start the ToDoApp
Create ToDoListComponent
$ django-admin startapp ToDoListComponent
Code your first view
- Write in ToDoListComponent/views.py
from django.shortcuts import render
from django.http import HttpResponse
# Create your views here.
def index(request):
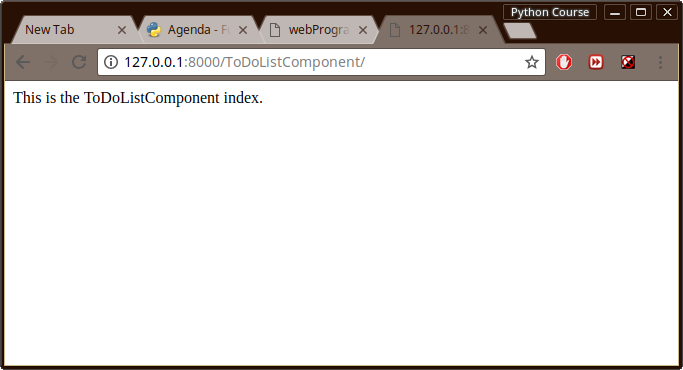
return HttpResponse("This is the ToDoListComponent index.")
Map view to a URL
- Create file
ToDoListComponent/urls.py - Write the code:
			from django.urls import path

			from . import views

			urlpatterns = [
			    path('', views.index, name='index'),
			]
Point the project root URLconf at the ToDoListComponent.urls module
- In ToDoApp/urls.py, add an import for django.urls.include and insert an include() in the urlpatterns list, so you have
			from django.contrib import admin
			from django.urls import path,include

			urlpatterns = [
			    path('ToDoListComponent/', include('ToDoListComponent.urls')),
			    path('admin/', admin.site.urls),
			]
Verify
- Go to http://127.0.0.1:8000/ToDoListComponent/
- You should see:
Path? Routes?
- Route is a string that contains a URL pattern. When processing a request, Django starts at the first pattern in urlpatterns list (inToDoApp/urls.py) and makes its way down the list, comparing the requested URL against each pattern until it finds one that matches.
View?
- A view function, or view for short, is simply a Python function that takes a Web request and returns a Web response. This response can be the HTML contents of a Web page, or a redirect, or a 404 error, or an XML document, or an image . . . or anything,
- When Django finds a matching URL pattern, it calls the specified view function with an HttpRequest object as the first argument.
- Or simple speaking, the view returns an HTML page which will be presented on the requested URL.
Database setup
Database setup
Overview of SQLite
- SQLite is an in-process library that implements a self-contained, serverless, zero-configuration, transactional SQL database engine
- SQLite is in the public domain and is thus free for use for any purpose, commercial or private.
- SQLite is included in Python, so you won’t need to install anything else to support your database. When starting your first real project, however, you may want to use a more scalable database like PostgreSQL
Setup the ToDoApp SQLite DB
- First, lets activate the DB needed for the pre-installed Django apps (admin, auth, contenttypes, sessions)
python manage.py migrate
			Operations to perform:
			  Apply all migrations: admin, auth, contenttypes, sessions
			Running migrations:
			  Applying contenttypes.0001_initial... OK
			  Applying auth.0001_initial... OK
			  Applying admin.0001_initial... OK
			  Applying admin.0002_logentry_remove_auto_add... OK
			  Applying contenttypes.0002_remove_content_type_name... OK
			  Applying auth.0002_alter_permission_name_max_length... OK
			  Applying auth.0003_alter_user_email_max_length... OK
			  Applying auth.0004_alter_user_username_opts... OK
			  Applying auth.0005_alter_user_last_login_null... OK
			  Applying auth.0006_require_contenttypes_0002... OK
			  Applying auth.0007_alter_validators_add_error_messages... OK
			  Applying auth.0008_alter_user_username_max_length... OK
			  Applying auth.0009_alter_user_last_name_max_length... OK
			  Applying sessions.0001_initial... OK
Create the model of ToDoApp
- Django uses models to interact with the database.
- Each model represents a table in the database and it is used to add, update, delete data into the correponding table.
- It's a kind of abstraction of database operations, so you do not need to know perfectly well SQL
- Write in file
ToDoListComponent/models.py
			from django.db import models

			# Create your models here.
			class Task(models.Model):
				id = models.AutoField(primary_key=True)
			    title = models.CharField('Title', max_length=100)
			    description = models.TextField('Description')
			    created = models.DateTimeField(auto_now_add=True)
			    due = models.DateTimeField('due date')
			    end = models.DateTimeField('end date')

			    def __str__(self):
			        return self.title
Plug the app
- To include the app in our project, we need to add a reference to its configuration class in the INSTALLED_APPS setting
- Open the
ToDoApp/settings.pyand append to it: 'ToDoListComponent'
			INSTALLED_APPS = [
			    'ToDoListComponent',
			    'django.contrib.admin',
			    'django.contrib.auth',
			    'django.contrib.contenttypes',
			    'django.contrib.sessions',
			    'django.contrib.messages',
			    'django.contrib.staticfiles',
			]
Activate the app
$ python manage.py makemigrations ToDoListComponent
See the SQL which will be created
$ python manage.py sqlmigrate ToDoListComponent 0001
			CREATE TABLE "ToDoListComponent_task" (
				"id" integer NOT NULL PRIMARY KEY AUTOINCREMENT,
				"title" varchar(100) NOT NULL,
				"description" text NOT NULL,
				"created" datetime NOT NULL,
				"due" datetime NOT NULL,
				"end" datetime NOT NULL);
			COMMIT;
Create the model table in the DB
- Now, run migrate tool to create the ToDoListComponent model tables in your database:
python manage.py migrate
			Operations to perform:
			  Apply all migrations: ToDoListComponent, admin, auth, contenttypes, sessions
			Running migrations:
			  Applying ToDoListComponent.0001_initial... OK
Introducing the Django Admin
Introducing the Django Admin
Creating an admin user
In root Project Folder (ToDoAppProject) type:
$ python manage.py createsuperuser
You'll be prompt to enter the admin user details
			Username (leave blank to use 'nemsys'): admin
			Email address: admin@test.me
			Password:
			Password (again):
			This password is too short. It must contain at least 8 characters.
			This password is too common.
			This password is entirely numeric.
			Password:
			Password (again):
			Superuser created successfully.
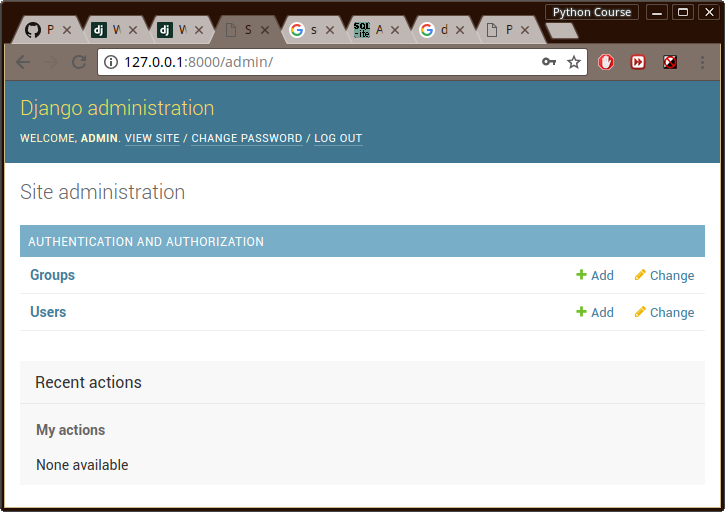
Start the Admin Control Panel
- If there are any running Django server stop it first
- Now, start the server again:
$ python manage.py runserver
An admin panel should be loaded:
Add our ToDoApp to the Admin Interface
- Open
ToDoListComponent/admin.pyand register our Task model:
			from django.contrib import admin

			# Register your models here.
			from .models import Task

			admin.site.register(Task)
- If you refresh the Admin Interface (CTRL+F5), you should now see our Tasks model
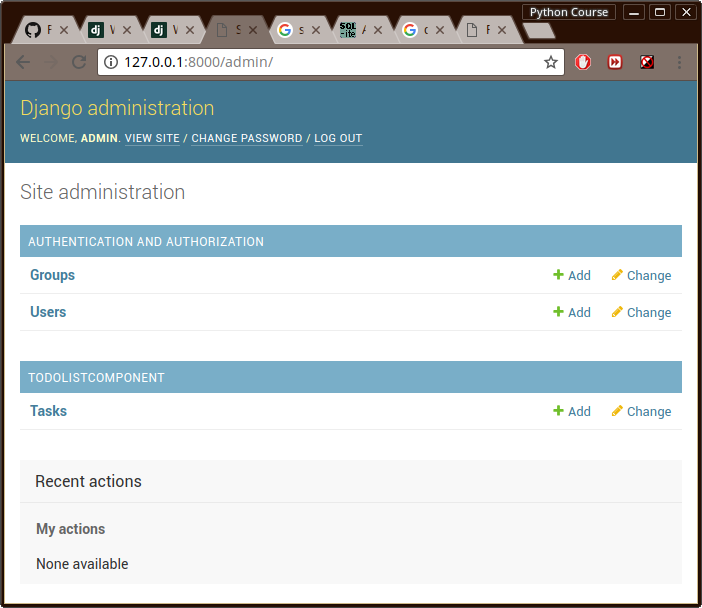
- From here, you can interface with the Task table, and add/modify/remove data
- The edit form will be automatically generated from the Tasks model.
Query DB from our ToDoApp
- Change
ToDoListComponent/views.pyas:
from django.shortcuts import render
from django.http import HttpResponse
from .models import Task
def index(request):
latest_tasks = Task.objects.order_by('-due')[:5]
output ="Taks:
"
output += ', '.join([q.title for q in latest_tasks])
return HttpResponse(output)
Add some Templates
Add some Templates
task_list template
- In ToDoListComponent create a folder named
templatesand make the filetasks_index.htmlin it.
			ToDoListComponent/
			├── admin.py
			├── apps.py
			├── __init__.py
			├── migrations
			│   ├── 0001_initial.py
			│   ├── __init__.py
			│   └── __pycache__
			│       ├── 0001_initial.cpython-36.pyc
			│       └── __init__.cpython-36.pyc
			├── models.py
			├── __pycache__
			│   ├── admin.cpython-36.pyc
			│   ├── apps.cpython-36.pyc
			│   ├── __init__.cpython-36.pyc
			│   ├── models.cpython-36.pyc
			│   ├── urls.cpython-36.pyc
			│   └── views.cpython-36.pyc
			├── templates
			│   └── tasks_index.html
			├── tests.py
			├── urls.py
			└── views.py
- Add the HTML template code in
templates/tasks_index.html
			<!DOCTYPE html>
			<html>
			<head>
			  <link rel="stylesheet" href="https://maxcdn.bootstrapcdn.com/bootstrap/3.3.7/css/bootstrap.min.css">
			  <script src="https://ajax.googleapis.com/ajax/libs/jquery/3.2.1/jquery.min.js"></script>
			  <script src="https://maxcdn.bootstrapcdn.com/bootstrap/3.3.7/js/bootstrap.min.js"></script>
			  <title>ToDo App</title>
			</head>
			<body>
			  <div class="jumbotron text-center">
			    <h1>ToDo's</h1>
			  </div>

			  <div class="container">
			    <div class="row">
			      <div class="col-sm-4">
			      </div>
			      <div class="col-sm-4">
			        <h3>Tasks List</h3>
			        <table>
			          <tr>
			            <th>Task</th>
			            <th>Due?</th>
			          </tr>
			          {% for task in task_list %}
			          <tr>
			            <td>
			              {{ task.title }}
			            </td>
			            <td>
			              {{ task.due }}
			            </td>
			          </tr>
			          {% endfor %}
			        </table>
			      </div>
			      <div class="col-sm-4">
			      </div>
			    </div>
			  </div>
			</body>
			</html>
Or copy the raw code from here
- Update our
ToDoListComponent/views.pyin order to use the template, and fill it will DB data
			from django.shortcuts import render
			from django.http import HttpResponse
			from .models import Task

			def index(request):
				# query the DB
		    task_list = Task.objects.all()

		    return render(
		        request,
		        'tasks_index.html',
		        {
		            'task_list' : task_list,
		        }
		    )
Add some CSS
- In the ToDoListComponent folder create the folder path
static/css, and in it - make the filebase.css
			ToDoListComponent/
			├── admin.py
			├── apps.py
			├── __init__.py
			├── migrations
			│   ├── 0001_initial.py
			│   ├── __init__.py
			│   └── __pycache__
			│       ├── 0001_initial.cpython-36.pyc
			│       └── __init__.cpython-36.pyc
			├── models.py
			├── __pycache__
			│   ├── admin.cpython-36.pyc
			│   ├── apps.cpython-36.pyc
			│   ├── __init__.cpython-36.pyc
			│   ├── models.cpython-36.pyc
			│   ├── urls.cpython-36.pyc
			│   └── views.cpython-36.pyc
			├── static
			│   └── css
			│       └── base.css
			├── templates
			│   └── tasks_index.html
			├── tests.py
			├── urls.py
			└── views.py
- Put some CSS into
static/css/base.css, and refresh the page/or run the server again, if it was turn off
			body{
				background: #FFBDBD
			}
			td {
			  padding: 10px 5px;
			}
Useful Commands
Useful Commands
Django
- Run Django Server
- python manage.py runserver
Resources
Resources
Resources
- Get the code: ToDoAppProject.zip
- Writing your first Django app - the official Django Tutorial which walks you through creating a basic poll application
- heroku-django-template - A Django 2.0 base template featuring all recommended best practices for deployment on Heroku and local development.
These slides are based on
customised version of
framework