Share and present your project with Jupyter Notebooks
Created for
Created by
2018 - 2021,

Jupyter Notebook Overview
Jupyter Notebook Overview
What is Jupyter Notebook?
- A client-server application that allows editing and running notebook documents via a web browser
- Notebook Documents are documents, which can contain both computer code (e.g. python) and rich text elements (paragraph, equations, graphics, links, etc…).
- The code can be executed in real time
What is Jupyter Notebook?
- The name Jupyter is a loose acronym from:
- Julia, Python, R
- Jupyter Notebooks can be used with different programming languages, if you install the right kernel
- list of available kernels
- For Python2/3, the iPython kernel is pre-installed!
What is Jupyter Notebook Document?
- A Jupyter Notebook document is a JSON document, following a versioned schema.
- It contains an ordered list of input/output cells.
- Each cell can contain code, text (and Markdown), formulae, plots and rich media (images, audio, video...)
Output Formats
- Jupyter notebooks document can be converted to a number of open standard output formats:
- HTML, presentation slides, LaTeX, PDF, ReStructuredText, Markdown, Python.
On the Cloud
- The major cloud providers have adopted the Jupyter Notebook
- Google Colaboratory
- Amazon SageMaker Notebooks
- Microsoft Azure Notebook
Timeline
- 2011, December - first release
- 2014 - Project Jupyter founded
- 2015 - GitHub and the Jupyter Project announced native rendering of Jupyter notebooks (.ipynb files) on the GitHub platform.
- 2019,February - JupyterLab is Ready for Users - for daily use (installation, documentation, try it with Binder)
Install Jupyter Notebook
In next labs we are going to use jupyterlab, so you can skip this section
- Prerequisites
- Python 3.3 or greater/Python 2.7)
- Anaconda users
- Anaconda includes the JupyterNotebooks
- Using pipenv
pipenv install jupyter- reference: Installing Jupyter Notebook
JupyterLab - the next-generation web-based user interface for Project Jupyter
JupyterLab - the next-generation web-based user interface for Project Jupyter
Overview
- JupyterLab is the next-generation user interface for Project Jupyter
- It's a brand new implementation of the classic Jupyter Notebook, using the new Front-End technologies which allows for adding new features and extensions
- The notebook document format used in JupyterLab is the same as in the classic Jupyter Notebook
Overview
- JupyterLab offers an IDE-like experience to users
- It puts together most of the instruments a data scientist need: code/text editors, terminals, image viewer, python console.
- And they work in a synchronised way.
- JupyterLab allows third-party sides to write extensions (npm packages) for it through the JupyterLab public APIs
Install JupyterLab
- Conda
conda install -c conda-forge jupyterlab- Pip
pip install jupyterlab- If installing using per user (--user), you must add the user-level bin directory to your PATH environment variable in order to launch jupyter lab
- Pipenv
pipenv install jupyterlab- In order to launch jupyter lab, you must activate the project’s virtualenv.
- Reference: JupyterLab>Installation
Basic operations
Basic operations
Start the server
- Make sure you are in the folder, containing your project files
- Activate the virtual environment
			cd /your/project/folder

			# activate the virtual environment:
			pipenv shell

			# start the Jupyter server:
			jupyter notebook

			# in case of problems: start the Jupyter server with a clean config:
			jupyter notebook --generate-config
- Jupyter Notebook will be opened automatically in your browser
Stop the server
- Press CTRL+C on the Terminal running jupyterlab
- Or if you're lazy to type 'y', then double press CTL+C
- Or just exit that Terminal
Shutdown this notebook server (y/[n])? y
Managing Workspaces
- JupyterLab sessions always reside in a workspace
- Workspaces contain the state of JupyterLab: the files that are currently open, the layout of the application areas and tabs, etc
- The default workspace does not have a name and resides at the primary /lab URL
http(s)://<server:port>/<lab-location>/lab- All other workspaces have a name that is part of the URL:
http(s)://<server:port>/<lab-location>/lab/workspaces/foo- More on JupyterLab URLs and Workspaces: JupyterLab URLs
Working with Notebooks
- Live Demo
- reference: Notebooks>Notebooks
Upload your Jupyter Notebook to GitHub
Upload your Jupyter Notebook to GitHub
- There is nothing different than pushing any other file to your github account:
- Add your changes to the stage
- Commit those changes
- Push the branch to your GitHub repo
				# add your changes to the stage:
				$ git add -A
				# commit those changes:
				$ git commit -m'__Describe your changes here__'
				# push the branch (assuming "master" below)to your GitHub repo:
				$ git push origin master
Share/Render your JupyterNotebooks (GitHub Render)
- You can use github.com to host your .ipynb files for free
- GitHub can render .ipynb files. For more details check github docs
- when you click on it (the
.ipynbextension) github will try to render the notebook in your browse - You can copy that URL and share it with anybody
- Like that: JupyterNotebook_basics
Share/Render your JupyterNotebooks (nbviewer)
The preferred way
- nbviewer.jupyter.org is a Web Service to render .ipynb files
- You can render there your .ipynb files, hosted on github, or GoogleDrive, Dropbox, ...
- Like that: JupyterNotebook_introduction
Interact and share your Notebooks through Binder
Interact and share your Notebooks through Binder
Binder overview
- binder - Turn a GitHub repo into a collection of interactive notebooks
- Builds a docker images from a git repository
- Uses JupyterHub - Multi-user server for Jupyter notebooks - to execute the notebook
- JupyterNotebooksExamples Repo -

- You have to be patient in order binder to build the Docker image and start the server...
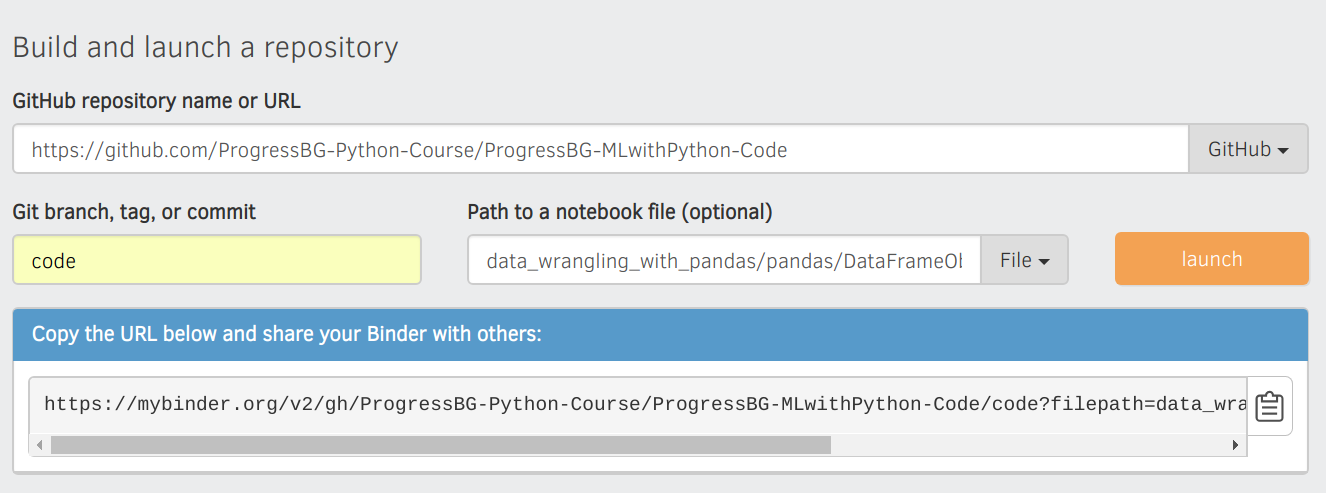
Generating a shareable Binder link
- To generate a link for your github repository/file, visit mybinder.org
- Type in the information for your repository (repo name, branch,...).
- You will see your Binder link automatically generated as you fill in the form
- The link structure is:
https://mybinder.org/v2/<provider-name>/<org-name>

			/<repo-name>/<branch|commit|tag>?
filepath=<path/to/notebook.ipynb>
Generating a shareable Binder link to a file - screenshot
- Note, that the
pathnameis relative to your github repo folder
Useful Resources
Useful Resources
References
References
Video: Getting Started with JupyterLab (Beginner Level) | SciPy 2018 Tutorial | Jason Grout
Video: Binder 2.0: Next Gen of Reproducible Scientific Environments w/ repo2docker & BinderH | SciPy 2018
Docs
These slides are based on
customised version of
framework